WHMCS SSL module User Guide
This instruction describes the installation, configuration and use of the Xolphin SSL Module for WHMCS.
Install module
The WHMCS SSL Module is compliant with WHMCS version 6 and above. The WHMCS SSL module can be downloaded here, it is installed automatically.
Manual installation
Another option is manual installation. For this, after unpacking the ZIP file, the files and directories have to be installad on the right locations.
- Place the modules/servers/sslcertificates directory in the modules/servers/ directory of the WHMCS installation.
- Place the modules/addons /sslcertificates directory in the modules/addons / directory of the WHMCS installation.
- Place the xolphin directory in the root directory of the WHMCS installation.
- Place the template file configureproduct.tpl in the templates/orderforms/boxes/ directory of the WHMCS installation.
Configuration
After the installation is completed, follow the steps below to start using the WHMCS module.
Preparation
- Log in to WHMCS as administrator.
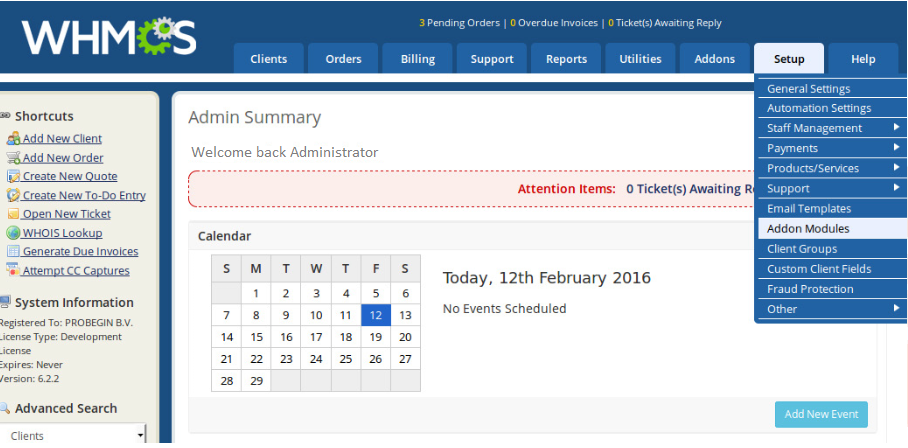
- In the menu, go to Setup and select Addon Modules.
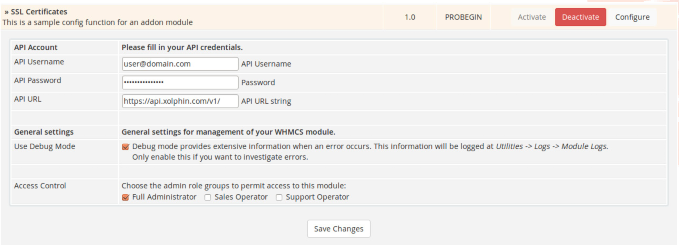
- Search for the addon SSL certificates, select Activate on the right side, and then Configure.
- Fill in your API Username and API Password to connect with Xolphin.
- Tick the checkbox Use Debug Mode if you want to save the logfiles from the module.
- Choose the admin role groups to determine access to the module.
- Click on save to save the settings.
- Go to the section Addons and select the module SSL certificates. Here the CronJob link can be copied to update the status and to install certificates.
Install products
- Go to Addons > SSL certificates.
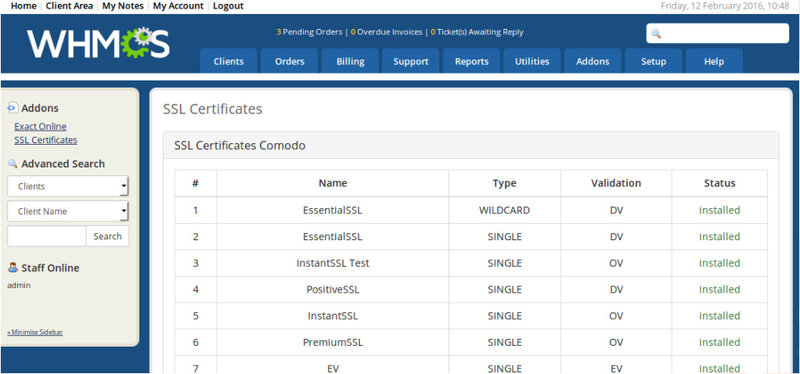
- Determine wheter you want to install products automatically and click on Install. The list of products will be shown.
- Go to Setup → Products & Services → Products & Services and check the list with the installed certificates.
- Here you can optionally select the option to use a specific theme. The included theme works best with the boxes theme.
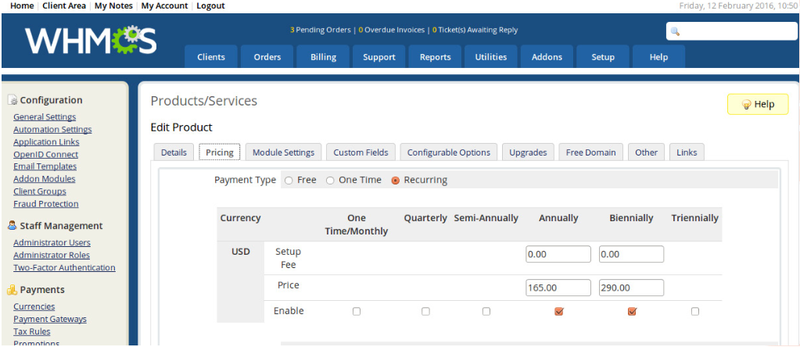
- The certificates are labeled with Xolphin's standard prices by default. You can alter them in the pricing table.
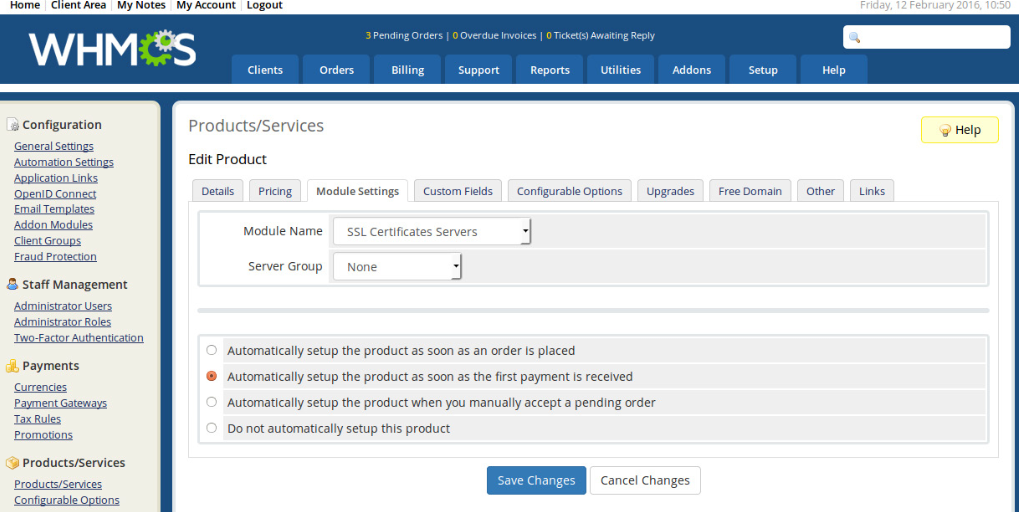
- All products are connected to the SSL Certificates Server Module. This can be checked on the Module Settings tab, an order time can be set here too. The option 'Automatically setup the product as soon as the first payment is received' is selected by default. This means that after the invoice is (completely) paid, the order with the userdata (CSR, type of certificate, type of validation, etc.), will be sent to Xolphin.

- On the tab Details one or more of the installed certificates can be hidden from the order form. It's also possible to delete a product, but to retrieve it it has to be installed manually.
Note: If you deactivate the module, all the products will remain in place.
Order certificates
Please pay attention to the following when ordering certificates:
- To order a certificate and install it automatically, you have to install and configure Server in WHMCS through Setup → Products & Services → Servers. For this you need a hosting package that can be connected to that server. Without this, the module won't be able to connect to the server and generate a CSR, validate or install it.
- The module works with DirectAdmin, cPanel and Plesk servers.
- Certificates can be ordered in the Client Area, using one of these scenarios:
- Both account in hosting package in WHMCS
- Account in WHMCS, no hosting package in WHMCS
- Account in WHMCS, hosting package outside WHMCS
- No account or hosting package in WHMCS
- No account in WHMCS, hosting package outside WHMCS.
Follow the steps below to place an order:
- Open Client area.
- Go to Services → Order new Services
- Select the certificate provider (brand) below Categories.
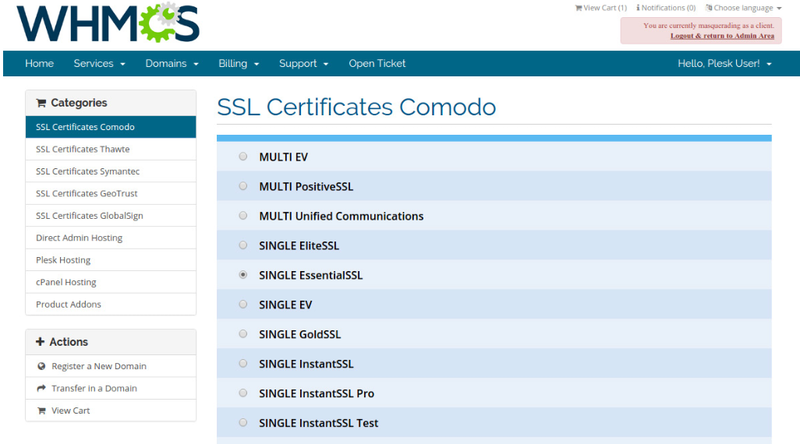
- Select a certificate.
- Select your hosting package:
- I have a hosting package in WHMCS - the certificate will be created, validated and installed automatically.
- I have my own hosting package - the user needs to generate the CSR on his own user panel.
- I don't have a hosting package - the client needs to buy a server first (This comment will be shown when this option is selected).
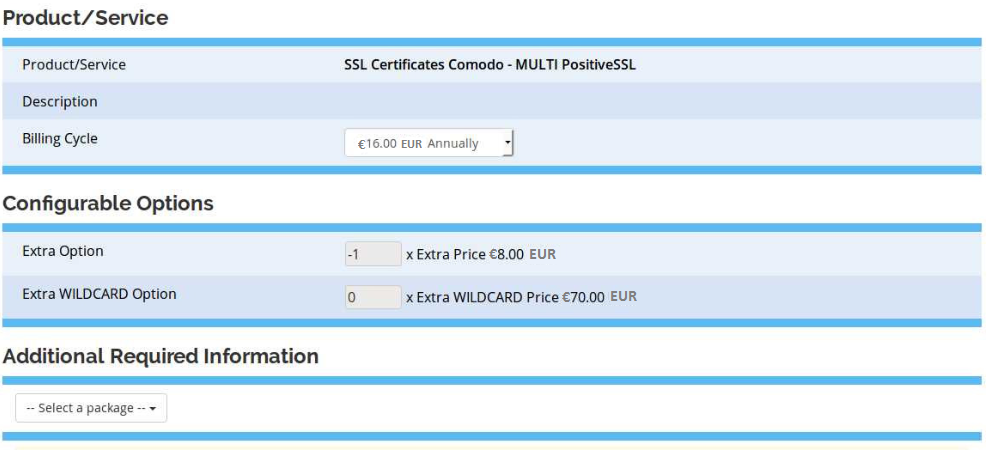
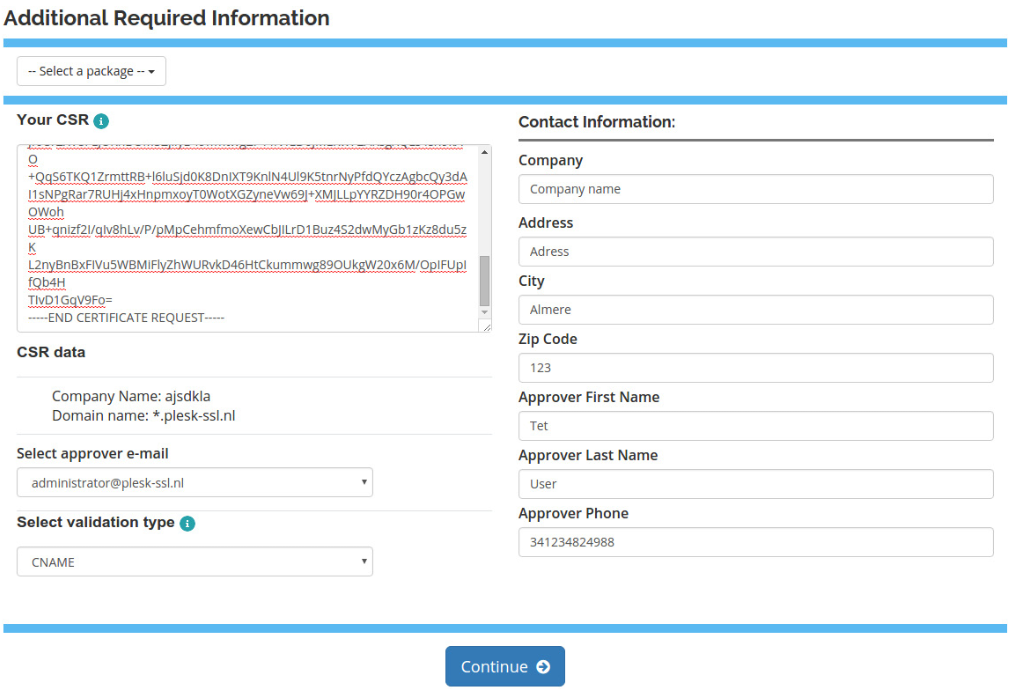
Note: While selecting a Multidomain product, extra fields will appear in the Order form below Configureable Options: Extra Option to add the number of regular domains and Extra Wildcard Options to add extra wildcard domains. This function calculates the correct certificate prices.
- Fill in the domain name and click on Get e-mails to retrieve e-mailaddresses.
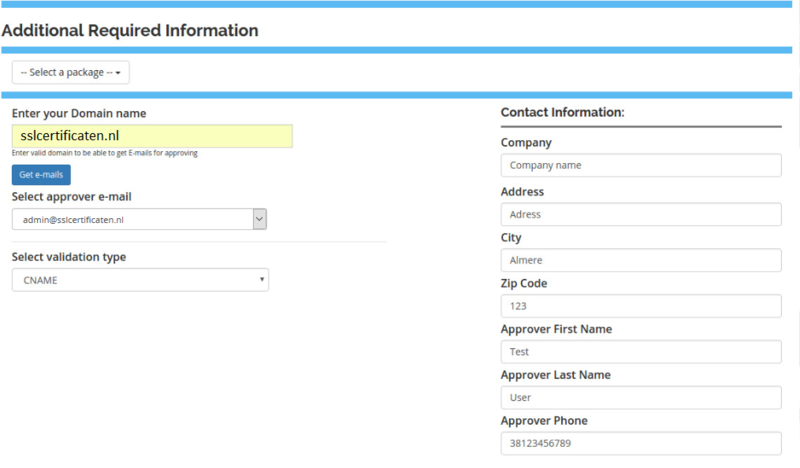
- Select an e-mailaddress.
- Select a validation type.
- Fill in the contact information en press Continue to complete the order.
- Read the information message and click somewhere on the screen.
Exceptions for automatic installation
A few exceptions apply to automatic installation, they are shown in the orderforms' pop-ups:
- Multidoman certificates cannot be installed automatically.
- The CSR for a wildcard certificate cannot be generated on Plesk panel through API (This might be resolved in a later release).
- 'Validation type' by 'Upload file' does not work on Plesk panel through API (This might also be resolved in a later release).
After the order is completed in the Client area, it is shown in the Admin part in the list of orders. There will also be a corresponding Invoice. When using the default settings, the order to Xolphin will be posted after the payment is done and the Invoice status is set to paid. In WHMCS, the product can be found in Services → My services. Before the admin accepts the product manually, the status is Pending.
- Set the status of the Invoice.
- Go to Utilities → Logs → Activity Logs. Check the last record with the description: Module.
- Create Succesful - Service ID:111 (Service ID is the ID of the product that you see if you open it in the Admin part or in the Client area in the URL).
- Go to Orders.
- Open the Order for the Service.
- Remove the tick from the checkbox Run Module create. Otherwise it will trigger another request being sent to Xolphin, and the status will stay Pending. Note: This is an error in WHMCS.
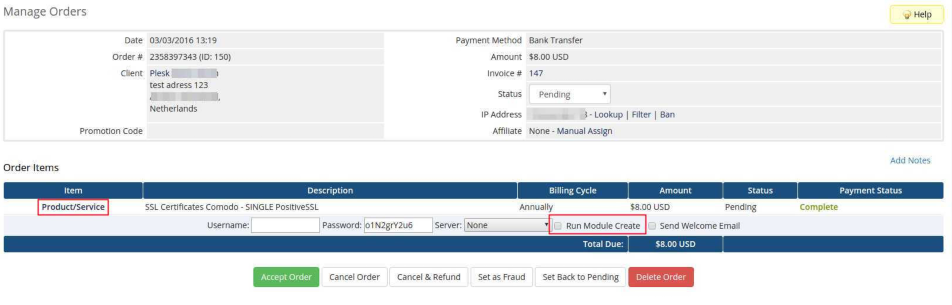
- The product is activated and all the Validation and Management data are available for Client.
Note: It may occur that automatic installation is already enabled for registered users. This means orders from new clients should be checked manually, and that orders won't be sent to Xolphin until the payment is completed. This option can be enabled/disabeld through Setup → General Settings → Ordering: Only Auto Provision for Existing. If this option is enabled, the Admin should follow the steps below to place the order succesfully:
- Set invoice to Paid.
- Go to Orders and open the clients' order.
- Rename the tick for the checkbox Run Module create, and click on Accept order.
- Open the clients' Product via Products/Services → tab Products/Services and select the product from the dropdown.
- Click on Create besides to Module Command.
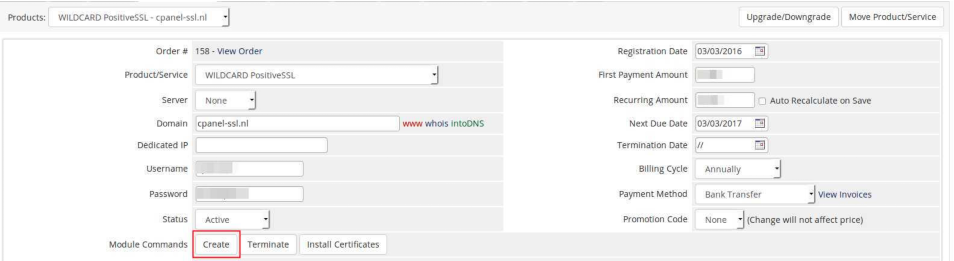
With Module Commands the following actions can be performed:
- Terminate - Cancel the product.
- Install Certificates - When errors occurred during the automatic installation and the installation of the certificate failed, this function can be used.
- Renew - Same function as in the Client Area, availalbe from 60 days to the expiry date.
- Autorenew - Same function as in the Client Area. Autorenew can be set at enable of disable. When enabeld, 30 days before expiry an invoice will be created for the next periode.
- In WHMCS the order can be found at Services → My services, but remains in Pending Status, until Admin accepts the order.
Manage certificates
After the paymant is done and the Admin accepts the order, the product becomes Active and the details, validation data and actions are shown.
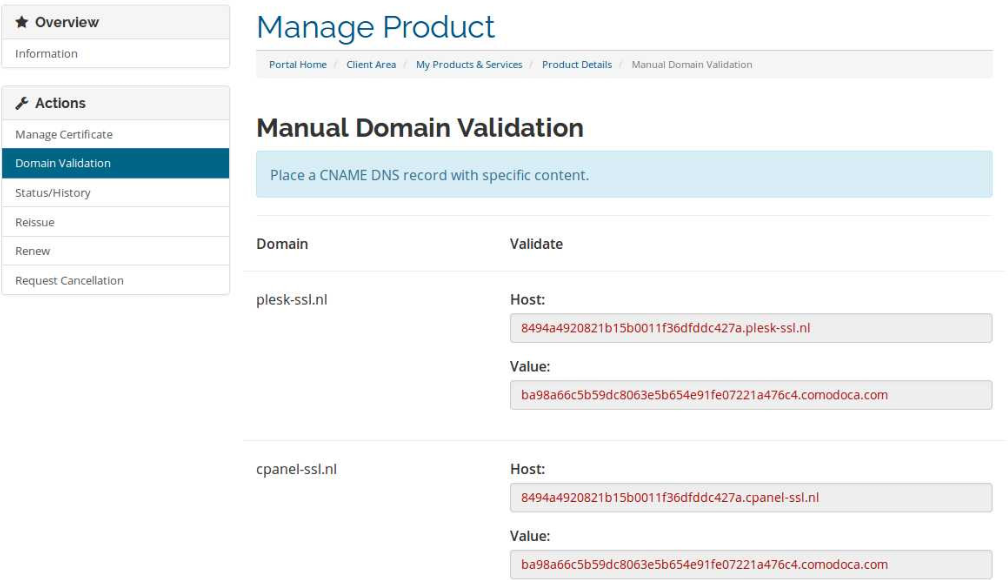
- As long as the product is not validated, the Domain Validation Page shows the information from the Xolphin order. If domain validation is not applicable, the status changes to in progress.
-
When the product is validated (after the Cronjob run), the Manage Certificate page becomes active. On this page the user is able to:
- Download a certificate (.zip folder)
- Renew a certificate (available 60 days before the expire date). Note: For multidomain certificates, Renew is a seperate tab.
- Reissue a certificate (this function isn't fully implemented)
- En/disable the automatic renewal (the invoice for the new period is provided whithin 30 days before the expire date)
Note:
- The Renew tab for multidomain certificates provides options for managing SAN's.
- The Request cancellation tab is a standard option in WHMCS. The function alerts the administator a client wants to cancel a certificate and is able to process this manually.
Module commands
The Admin panel can also be used to manage a request or install a certificate, for example if the regular request fails):
- Open user's profile
- Go to the tab Products/Services
- Open the service you whish to manage:
- Click on Create to resend and order to Xolphin
- Click on Install certificates to install.
Support
If you have any questions or remarks about the SSL Module, please contact us!
Easily order, manage and install SSL certificates directly on cPanel, DirectAdmin and Plesk
Get SSL Module